Please note that if you want the command line Model Checking Competition https://mcc.lip6.fr version of the tool you can find it here : https://github.com/yanntm/ITS-Tools-MCC
Requirements
- Java 11 or better standard edition (SE)
Note that you will get errors with Java 8; Eclipse platform has moved to Java 11 minimum since 2020-12 release.
That’s all really, we build statically linked binaries for major platforms (Win, Linux, OSX) and package them in the release.
If you’ve done this sort of thing before, you can simply install into eclipse using the update site https://lip6.github.io/ITSTools/ to install the All-In-One feature.
Step 1 :Install eclipse.
You can skip this step if you have a recent eclipse (Luna or better), otherwise get the “Eclipse IDE for Java Developers” it’s one of the smaller distributions.
Download the latest version of Eclipse for your platform and install it. We recommend you go for an archived release (tgz or zip) rather than automatic installer.
Download the archive, decompress it, and run eclipse.
The back-end model-checking tools are fully integrated in the installer for all major platforms (Mac OS, Windows or Linux and x64 architecture).
Step 2 : Eclipse integration with ITS tools.
NEW (May 2017): Our update site has moved to GitHub ! Update your update site address to ‘https://lip6.github.io/ITSTools/’
Start Eclipse. To deploy the user interface plugin into eclipse, go into the menu : “Help->Install New Software…”
In the “Work with” field, copy paste the following update site address :
Then select like on this screenshot
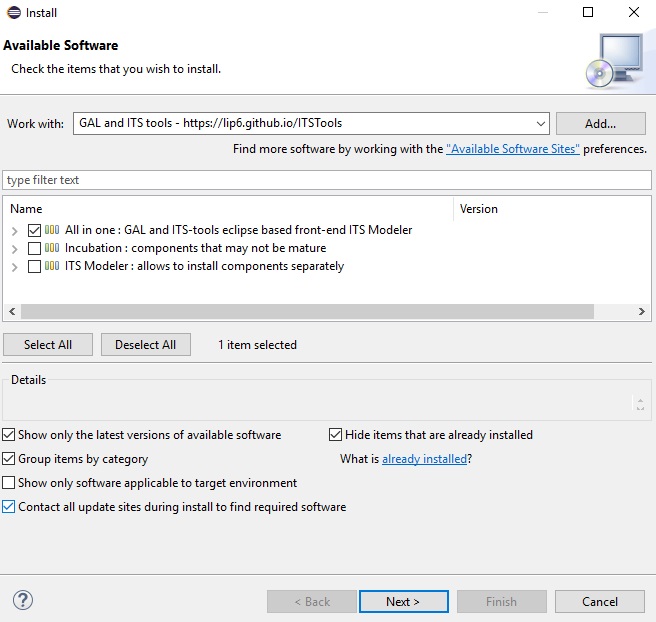
The first category allows to install all the features with a single selection. If you are only interested in some packages, the third category allows to pick and choose what will be installed.
Leave the “Contact all update sites” checkbox marked so necessary dependencies (Xtext if not yet installed) will be downloaded automatically from the eclipse releases official update site. Please be a bit patient, eclipse updates are pretty slow. Let eclipse restart when the installation finishes.
If you later want to update, the checkbox “contact all” can be left unchecked, this speeds install considerably.
Step 3 : Getting started.
That’s all, the tool is ready to run now. Right-clicking a .gal file now brings up “Run As…->ITS model-check”.
You can try to “File->New->Example->GAL examples” to get some example GAL models.
You can try to “File->New->Example->Fischer’s Mutual exclusion” to get an example Petri net model.
Or create a “New->General project” to host your own project and create a file with .gal extension to start the editor.
Optional Step : GraphViz
Users of GAL and textual formalisms can skip this step.
This package is optional, but really helps when manipulating large graphical models such as Petri nets. It allows to layout large graphs.
Download Graphviz
If you don’t already have graphviz, download it.. It is sometimes already available (linux, MacOS), try the command “dot” at a command line to check.
Configure Eclipse to use GraphViz
This step allows to activate the layout tool, to automatically set positions of Petri net nodes or other graphs. This step is only necessary if “dot” at a command line does not work, i.e. “dot” is not on the PATH.
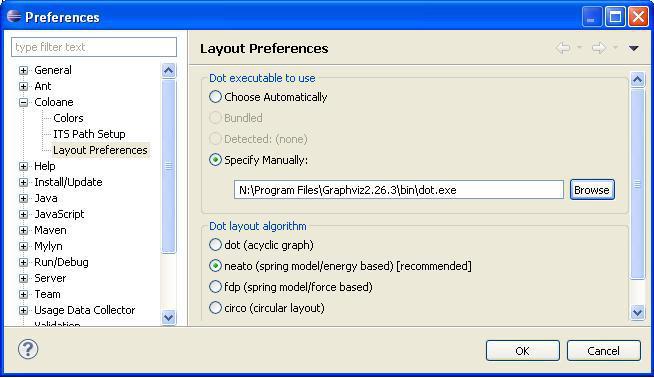
Inside eclipse, go to “Window Menu->Preferences” then open the category “Coloane -> Layout Preferences”
Use the “browse” button to find the “dot” executable in the “bin” subfolder of your GraphViz distribution.
Your preference screen should look like this :
Acknowledgements : Companies helping us
Hosting
![]()
- We are grateful to GitHub for hosting us and for all the great support it offers to develop collaborative large open source software.
Profiler

- JProfiler helps us track down and remove performance bottlenecks in our Java code. With ergonomic access to “allocation hot spot” and “call hot spot”, easy attach to running JVM, custom filtering, this tool has all you need to professionally optimize code. With their open-source friendly license policy, they helped us gain orders of magnitude in performance on many test cases.
Continous Integration

- We are grateful to travis-ci for their open-source project support policy, that allows us to use their public continuous integration technology in the cloud to build Java/Maven, Linux and OSX artifacts.

- We are grateful to AppVeyor for their open-source project support policy, that allows us to use their public continuous integration technology to build and distribute Windows targets.
![]()